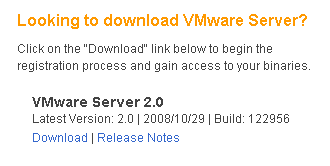
2. 记住安装序列号

3. 安装下载的rpm包
rpm -Uvh /u01/software/oracle/vmware/VMware-server-2.0.0-122956.x86_64.rpm
[root@DEV-Blur-DB-1 ~]# rpm -Uvh /u01/software/oracle/vmware/VMware-server-2.0.0-122956.x86_64.rpm
Preparing... ########################################### [100%]
1:VMware-server ########################################### [100%]
The installation of VMware Server 2.0.0 for Linux completed successfully.
You can decide to remove this software from your system at any time by
invoking the following command: "rpm -e VMware-server".
Before running VMware Server for the first time, you need to
configure it for your running kernel by invoking the
following command: "/usr/bin/vmware-config.pl".
Enjoy,
--the VMware team
[root@DEV-Blur-DB-1 ~]#
4. 安装完后进行初始化配置
运行
/usr/bin/vmware-config.pl
[root@DEV-Blur-DB-1 ~]# /usr/bin/vmware-config.pl
Making sure services for VMware Server are stopped.
Stopping VMware autostart virtual machines:
Virtual machines [FAILED]
Stopping VMware management services:
VMware Virtual Infrastructure Web Access
VMware Server Host Agent [FAILED]
Stopping VMware services:
VMware Authentication Daemon [ OK ]
Virtual machine monitor [ OK ]
You must read and accept the End User License Agreement to continue.
Press enter to display it.
按回车, 显示一堆版权信息,一直回车,输入yes
...
Software for internal or external use, promotion, review or as part of a
solution, please apply now at http://www.vmware.com/go/distribution.
Do you accept? (yes/no) yes
配置虚拟网络, 都回车即可
Thank you.
The bld-2.6.18-8.el5-x86_64smp-RHEL5 - vmmon module loads perfectly into the
running kernel.
The bld-2.6.18-8.el5-x86_64smp-RHEL5 - vmci module loads perfectly into the
running kernel.
The bld-2.6.18-8.el5-x86_64smp-RHEL5 - vsock module loads perfectly into the
running kernel.
Do you want networking for your virtual machines? (yes/no/help) [yes]
Configuring a bridged network for vmnet0.
Please specify a name for this network.
[Bridged]
Your computer has multiple ethernet network interfaces available: bond0, eth0,
eth1, eth2, eth3. Which one do you want to bridge to vmnet0? [eth0]
The following bridged networks have been defined:
. vmnet0 is bridged to eth0
Do you wish to configure another bridged network? (yes/no) [no]
Do you want to be able to use NAT networking in your virtual machines? (yes/no)
[yes]
Configuring a NAT network for vmnet8.
Please specify a name for this network. [NAT]
Do you want this program to probe for an unused private subnet? (yes/no/help)
[yes]
Probing for an unused private subnet (this can take some time)...
The subnet 192.168.225.0/255.255.255.0 appears to be unused.
The following NAT networks have been defined:
. vmnet8 is a NAT network on private subnet 192.168.225.0.
Do you wish to configure another NAT network? (yes/no) [no]
Do you want to be able to use host-only networking in your virtual machines?
[yes]
Configuring a host-only network for vmnet1.
Please specify a name for this network.
[HostOnly]
Do you want this program to probe for an unused private subnet? (yes/no/help)
[yes]
Probing for an unused private subnet (this can take some time)...
The subnet 192.168.191.0/255.255.255.0 appears to be unused.
The following host-only networks have been defined:
. vmnet1 is a host-only network on private subnet 192.168.191.0.
Do you wish to configure another host-only network? (yes/no) [no]
The bld-2.6.18-8.el5-x86_64smp-RHEL5 - vmnet module loads perfectly into the
running kernel.
选择管理端口, 随便输入, 默认的是902/8222/8333
Please specify a port for remote connections to use [902]
Please specify a port for standard http connections to use [8222]
Please specify a port for secure http (https) connections to use [8333]
建立管理帐号,输入默认的no, 不需要建立,就用默认的root用户管理
The current administrative user for VMware Server is ''. Would you like to
specify a different administrator? [no]
Using root as the VMware Server administrator.
设置虚拟机文件目录
In which directory do you want to keep your virtual machine files?
[/var/lib/vmware/Virtual Machines] /data/vmware
输入刚才记下的安装序列号
Please enter your 20-character serial number.
Type XXXXX-XXXXX-XXXXX-XXXXX or 'Enter' to cancel: A848J-FY2F1-U1PC4-41M19
选择程序安装目录,都用默认的
Creating a new VMware VIX API installer database using the tar4 format.
Installing VMware VIX API.
In which directory do you want to install the VMware VIX API binary files?
[/usr/bin]
In which directory do you want to install the VMware VIX API library files?
[/usr/lib/vmware-vix/lib]
The path "/usr/lib/vmware-vix/lib" does not exist currently. This program is
going to create it, including needed parent directories. Is this what you want?
[yes]
In which directory do you want to install the VMware VIX API document pages?
[/usr/share/doc/vmware-vix]
The path "/usr/share/doc/vmware-vix" does not exist currently. This program is
going to create it, including needed parent directories. Is this what you want?
[yes]
The installation of VMware VIX API 1.6.0 build-122956 for Linux completed
successfully. You can decide to remove this software from your system at any
time by invoking the following command: "/usr/bin/vmware-uninstall-vix.pl".
Enjoy,
--the VMware team
自动启动vmware后台服务
Starting VMware services:
Virtual machine monitor [ OK ]
Virtual machine communication interface [ OK ]
VM communication interface socket family: [ OK ]
Virtual ethernet [ OK ]
Bridged networking on /dev/vmnet0 [ OK ]
Host-only networking on /dev/vmnet1 (background) [ OK ]
DHCP server on /dev/vmnet1 [ OK ]
Host-only networking on /dev/vmnet8 (background) [ OK ]
DHCP server on /dev/vmnet8 [ OK ]
NAT service on /dev/vmnet8 [ OK ]
VMware Server Authentication Daemon (background) [ OK ]
Shared Memory Available [ OK ]
Starting VMware management services:
VMware Server Host Agent (background) [ OK ]
VMware Virtual Infrastructure Web Access
Starting VMware autostart virtual machines:
Virtual machines [ OK ]
The configuration of VMware Server 2.0.0 build-122956 for Linux for this
running kernel completed successfully.
[root@DEV-Blur-DB-1 ~]#
安装完成
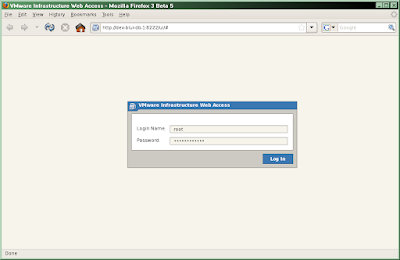
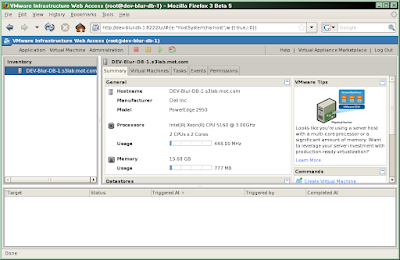
5. 然后登录web管理页面,就可以开始使用了
firefox http://DEV-Blur-DB-1:8222 &
用操作系统root用户的密码登录
6. 如果要创建64位的虚拟机
首先要下载如下工具,检查系统是否支持64位虚拟机的安装
http://www.vmware.com/download/ws/drivers_tools.html

如果不支持,显示:
[root@DEV-Blur-App-1 ~]# /u01/software/oracle/vmware/VMware-guest64check-6.0.0-45731
This host is NOT capable of running a 64-bit guest operating system under this
VMware product.
For more detailed information, see http://www.vmware.com/info?id=152
[root@DEV-Blur-App-1 ~]#
或
[root@CentOS-1 ~]# /u01/software/oracle/vmware/VMware-guest64check-6.0.0-45731
-bash: /u01/software/oracle/vmware/VMware-guest64check-6.0.0-45731: cannot execute binary file
[root@CentOS-1 ~]#
如果支持,显示:
[root@DEV-Blur-DB-1 ~]# /u01/software/oracle/vmware/VMware-guest64check-6.0.0-45731
This host is capable of running a 64-bit guest operating system under this
VMware product.
[root@DEV-Blur-DB-1 ~]#
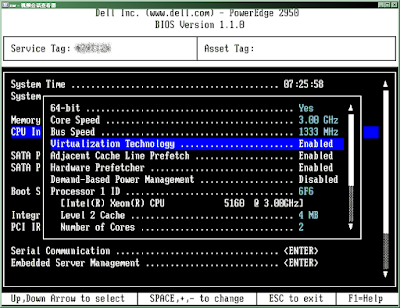
另外还要启用cpu的虚拟化功能,否则也不能安装64位的虚拟机
在bios中打开Virtualization Technology功能
7.
Updated on Dec. 17th 2008:
安装时没输序列号,不能启动虚拟机
想再通过WebUI界面选"Enter Serial Number"输入序列号,总是报错
Error Message:
The server response included one or more errors.
If these problems persist, please contact your system administrator.
Details:
InvalidLicense: The uploaded license content was not valid.
这是一个BUG, 只能重装或修改注册表
见:
VMware Server 2.0.0 (9/23/2008) serial problem
Licensing Bug in VMware Server 2.0 Build 122956
8.使用vmrun (Updated on Jan. 19 2009)
注册一个已有的虚拟机:
vmrun -T server -h https://localhost:8333/sdk -u root -p 'yourpasswd' register '[standard] c52x64/c52x64.vmx'
注销用unregister
启动虚拟机:
vmrun -T server -h https://localhost:8333/sdk -u root -p 'yourpasswd' start '[standard] c52x64/c52x64.vmx'
[root@DEV-Blur-DB-1 /data/vmware]# vmrun -T server -h https://localhost:8333/sdk -u root -p 'yourpasswd' start '[standard] c52x64/c52x64.vmx'
一直停在这里, 因为虚拟机文件是从别处拷来的, Web中提示
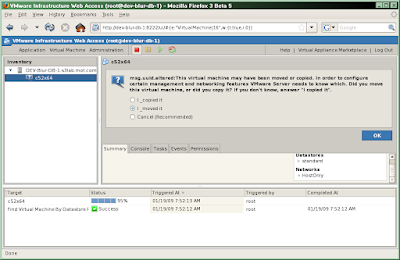
选move, 点OK
日志显示
Jan 19 07:52:13.535: vmx| MHZEstimate 2992
Jan 19 07:52:13.535: vmx| NumVCPUs 2
Jan 19 07:52:13.535: vmx| PShare: enabled 0, scanRate 0, checkRate 16
Jan 19 07:52:13.535: vmx| UUID: SMBIOS UUID is reported as '44 45 4c 4c 32 00 10 39-80 54 b3 c0 4f 31 32 58'.
Jan 19 07:52:13.535: vmx| UUID: location-UUID is 56 4d 9b a3 54 47 95 33-f3 75 36 da 38 83 88 1e
Jan 19 07:52:13.535: vmx| UUID: location-UUID is 56 4d 9b a3 54 47 95 33-f3 75 36 da 38 83 88 1e
Jan 19 07:52:13.535: vmx| UUID: location-UUID is 56 4d 9b a3 54 47 95 33-f3 75 36 da 38 83 88 1e
Jan 19 07:52:13.535: vmx| UUID: location-UUID is 56 4d 9b a3 54 47 95 33-f3 75 36 da 38 83 88 1e
Jan 19 07:52:13.535: vmx| Msg_Question:
Jan 19 07:52:13.535: vmx| [msg.uuid.altered] This virtual machine may have been moved or copied.
Jan 19 07:52:13.535: vmx|
Jan 19 07:52:13.535: vmx| In order to configure certain management and networking features VMware Server needs to know which.
Jan 19 07:52:13.535: vmx|
Jan 19 07:52:13.535: vmx| Did you move this virtual machine, or did you copy it?
Jan 19 07:52:13.535: vmx| If you don't know, answer "I copied it".
Jan 19 07:52:13.535: vmx|
Jan 19 07:52:13.535: vmx| ----------------------------------------
Jan 19 07:59:47.756: vmx| Msg_Question: msg.uuid.altered reply=1
Jan 19 07:59:47.756: vmx| UUID: Writing uuid.location value: '56 4d 9b a3 54 47 95 33-f3 75 36 da 38 83 88 1e'
Jan 19 07:59:47.788: vmx| AIOGNRC: numThreads=26 ide=0, scsi=2, passthru=1
Jan 19 07:59:47.788: vmx| WORKER: Creating new group with numThreads=26 (26)
Jan 19 07:59:47.788: vmx| Replay State = 0
关闭虚拟机用stop, 挂起用suspend
快照:
vmrun -T server -h https://localhost:8333/sdk -u root -p 'yourpasswd' snapshot '[standard] c52x64/c52x64.vmx'
VMWare Server版的只能建一个快照
恢复快照用revertToSnapshot
9. 访问内网
GUEST服务器不能访问内网
[root@c52x64 ~]# ifconfig eth0
eth0 Link encap:Ethernet HWaddr 00:0C:29:3C:15:83
inet addr:192.168.191.100 Bcast:192.168.191.255 Mask:255.255.255.0
inet6 addr: fe80::20c:29ff:fe3c:1583/64 Scope:Link
UP BROADCAST RUNNING MULTICAST MTU:1500 Metric:1
RX packets:553 errors:0 dropped:0 overruns:0 frame:0
TX packets:518 errors:0 dropped:0 overruns:0 carrier:0
collisions:0 txqueuelen:1000
RX bytes:49804 (48.6 KiB) TX bytes:82676 (80.7 KiB)
Base address:0x2000 Memory:d8920000-d8940000
[root@c52x64 ~]# netstat -rn
Kernel IP routing table
Destination Gateway Genmask Flags MSS Window irtt Iface
192.168.191.0 0.0.0.0 255.255.255.0 U 0 0 0 eth0
169.254.0.0 0.0.0.0 255.255.0.0 U 0 0 0 eth0
0.0.0.0 192.168.191.1 0.0.0.0 UG 0 0 0 eth0
[root@c52x64 ~]# ping 192.168.11.16 -c 3
PING 192.168.11.16 (192.168.11.16) 56(84) bytes of data.
--- 192.168.11.16 ping statistics ---
3 packets transmitted, 0 received, 100% packet loss, time 1999ms
[root@c52x64 ~]#
HOST服务器上配置路由
echo 1 >/proc/sys/net/ipv4/ip_forward
iptables -t nat -A POSTROUTING -s 192.168.191.0/24 -o bond0 -j MASQUERADE
[root@DEV-Blur-DB-1 /data/vmware/c52x64]# echo 1 >/proc/sys/net/ipv4/ip_forward
[root@DEV-Blur-DB-1 /data/vmware/c52x64]# iptables -t nat -A POSTROUTING -s 192.168.191.0/24 -o bond0 -j MASQUERADE
[root@DEV-Blur-DB-1 /data/vmware/c52x64]#
GUEST服务器能够访问内网了现在
[root@c52x64 ~]# ping 192.168.11.16 -c 3
PING 192.168.11.16 (192.168.11.16) 56(84) bytes of data.
64 bytes from 192.168.11.16: icmp_seq=1 ttl=62 time=0.337 ms
64 bytes from 192.168.11.16: icmp_seq=2 ttl=62 time=0.494 ms
64 bytes from 192.168.11.16: icmp_seq=3 ttl=62 time=0.539 ms
--- 192.168.11.16 ping statistics ---
3 packets transmitted, 3 received, 0% packet loss, time 2001ms
rtt min/avg/max/mdev = 0.337/0.456/0.539/0.090 ms
[root@c52x64 ~]#
10. vmware的文件
[root@QA-Blur-DB-2 /data/vmware/xen]# ls -lR
.:
total 14626252
-rw------- 1 root root 4294967296 Feb 18 02:15 564df6f6-c83d-ea54-eb5f-aa4ff090027c.vmem
drwxrwxrwx 2 root root       4096 Feb 18 02:15 564df6f6-c83d-ea54-eb5f-aa4ff090027c.vmem.lck
-rw-r--r-- 1 root root     108534 Feb 18 02:14 vmware-0.log
-rw-r--r-- 1 root root     195327 Feb 18 01:09 vmware-1.log
-rw-r--r-- 1 root root     456772 Feb 17 08:42 vmware-2.log
-rw-r--r-- 1 root root     142840 Feb 18 03:26 vmware.log
-rw------- 1 root root    5898240 Feb 18 03:27 xen-000002.vmdk
drwxrwxrwx 2 root root       4096 Feb 18 03:26 xen-000002.vmdk.lck
-rw------- 1 root root    1114112 Feb 18 03:26 xen_2-000001.vmdk
drwxrwxrwx 2 root root       4096 Feb 18 03:26 xen_2-000001.vmdk.lck
-rw------- 1 root root 8589934592 Feb 18 03:23 xen_2-flat.vmdk
-rw------- 1 root root        424 Feb 18 03:18 xen_2.vmdk
drwxrwxrwx 2 root root       4096 Feb 18 03:26 xen_2.vmdk.lck
-rw------- 1 root root       8684 Feb 18 02:15 xen.nvram
-rw------- 1 root root 4294967296 Feb 18 03:26 xen-Snapshot2.vmem
-rw------- 1 root root    1142865 Feb 18 03:26 xen-Snapshot2.vmsn
-rw------- 1 root root 1848115200 Feb 18 03:26 xen.vmdk
drwxrwxrwx 2 root root       4096 Feb 18 03:26 xen.vmdk.lck
-rw------- 1 root root       1011 Feb 18 03:26 xen.vmsd
-rwxr-xr-x 1 root root       2417 Feb 18 03:26 xen.vmx
-rw------- 1 root root        258 Feb 18 02:19 xen.vmxf

./564df6f6-c83d-ea54-eb5f-aa4ff090027c.vmem.lck:
total 4
-rw-r--r-- 1 root root 512 Feb 18 02:15 M64490.lck

./xen-000002.vmdk.lck:
total 4
-rw-r--r-- 1 root root 512 Feb 18 03:26 M10440.lck

./xen_2-000001.vmdk.lck:
total 4
-rw-r--r-- 1 root root 512 Feb 18 03:26 M00790.lck

./xen_2.vmdk.lck:
total 4
-rw-r--r-- 1 root root 512 Feb 18 03:26 M12110.lck

./xen.vmdk.lck:
total 4
-rw-r--r-- 1 root root 512 Feb 18 03:26 M30237.lck
[root@QA-Blur-DB-2 /data/vmware/xen]#
.vmem 虚拟内存文件,虚拟机启动时创建
.vmdk 虚拟硬盘文件
-flat.vmdk 创建时即分配的不可扩展的虚拟硬盘文件
.nvram BIOS的NVRAM
-000001.vmdk 快照保存的虚拟硬盘文件
两个硬盘快照文件的序号不一样是因为照了两次快照, 第二个硬盘(xen_2.vmdk)是在第一和第二次快照之间创建的,所以它的快照文件的编号是1(xen_2-000001.vmdk)
第一块硬盘的快照文件的编号变成了2(xen-000002.vmdk)
-Snapshot1.vmem 保存内存快照文件
-Snapshot1.vmsn 快照描述文件,二进制
.vmsd 快照的描述文件
.vmx 虚拟机的配置文件
.vmxf 虚拟机文件 XML格式
.lck 锁文件
[root@QA-Blur-DB-2 /data/vmware/xen]# cat xen_2.vmdk
# Disk DescriptorFile
version=1
encoding="UTF-8"
CID=eaa854f6
parentCID=ffffffff
createType="monolithicFlat"

# Extent description
RW 16777216 FLAT "xen_2-flat.vmdk" 0

# The Disk Data Base
#DDB

ddb.toolsVersion = "0"
ddb.adapterType = "lsilogic"
ddb.geometry.sectors = "63"
ddb.geometry.heads = "255"
ddb.geometry.cylinders = "1044"
ddb.uuid = "60 00 C2 97 99 59 c3 41-da ee 7e dd 20 af 7e 3c"
ddb.virtualHWVersion = "7"
[root@QA-Blur-DB-2 /data/vmware/xen]# cat xen.vmsd
.encoding = "UTF-8"
snapshot.lastUID = "2"
snapshot.numSnapshots = "1"
snapshot.current = "2"
snapshot0.uid = "2"
snapshot0.filename = "xen-Snapshot2.vmsn"
snapshot0.displayName = "VMware Server Undopoint"
snapshot0.description = "Snapshot Description."
snapshot0.type = "1"
snapshot0.createTimeHigh = "287528"
snapshot0.createTimeLow = "-131309260"
snapshot0.numDisks = "2"
snapshot0.disk0.fileName = "xen.vmdk"
snapshot0.disk0.node = "scsi0:0"

snapshot1.uid = "2"
snapshot1.filename = "xen-Snapshot2.vmsn"
snapshot1.parent = "1"
snapshot1.displayName = "VMware Server Undopoint"
snapshot1.description = "Snapshot Description."
snapshot1.type = "1"
snapshot1.createTimeHigh = "287528"
snapshot1.createTimeLow = "-131309260"
snapshot1.numDisks = "2"
snapshot1.disk0.fileName = "xen-000001.vmdk"
snapshot1.disk0.node = "scsi0:0"
snapshot1.disk1.fileName = "xen_2.vmdk"
snapshot1.disk1.node = "scsi0:1"

snapshot.needConsolidate = "FALSE"
snapshot0.disk1.fileName = "xen_2.vmdk"
snapshot0.disk1.node = "scsi0:1"
[root@QA-Blur-DB-2 /data/vmware/xen]# cat xen.vmx
#!/usr/bin/vmware
.encoding = "UTF-8"
config.version = "8"
virtualHW.version = "7"
floppy0.present = "FALSE"
mks.enable3d = "TRUE"
pciBridge0.present = "TRUE"
pciBridge4.present = "TRUE"
pciBridge4.virtualDev = "pcieRootPort"
pciBridge4.functions = "8"
pciBridge5.present = "TRUE"
pciBridge5.virtualDev = "pcieRootPort"
pciBridge5.functions = "8"
pciBridge6.present = "TRUE"
pciBridge6.virtualDev = "pcieRootPort"
pciBridge6.functions = "8"
pciBridge7.present = "TRUE"
pciBridge7.virtualDev = "pcieRootPort"
pciBridge7.functions = "8"
vmci0.present = "TRUE"
nvram = "xen.nvram"
virtualHW.productCompatibility = "hosted"
ft.secondary0.enabled = "TRUE"
tools.upgrade.policy = "useGlobal"
powerType.powerOff = "soft"
powerType.powerOn = "hard"
powerType.suspend = "hard"
powerType.reset = "soft"

displayName = "xen"
extendedConfigFile = "xen.vmxf"

numvcpus = "2"
scsi0.present = "TRUE"
scsi0.sharedBus = "none"
scsi0.virtualDev = "lsilogic"
memsize = "4096"
scsi0:0.present = "TRUE"
scsi0:0.fileName = "xen-000002.vmdk"
scsi0:0.writeThrough = "TRUE"
ethernet0.present = "TRUE"
ethernet0.allowGuestConnectionControl = "FALSE"
ethernet0.virtualDev = "e1000"
ethernet0.features = "1"
ethernet0.wakeOnPcktRcv = "FALSE"
ethernet0.networkName = "HostOnly"
ethernet0.addressType = "generated"
guestOS = "rhel5-64"
uuid.location = "56 4d f6 f6 c8 3d ea 54-eb 5f aa 4f f0 90 02 7c"
uuid.bios = "56 4d f6 f6 c8 3d ea 54-eb 5f aa 4f f0 90 02 7c"
vc.uuid = "52 52 36 18 79 dd e3 fd-6e 6d 49 50 ca e2 91 b9"

ide1:0.present = "TRUE"
ide1:0.fileName = "/data/vmware/centos/5.2/isos/x86_64/CentOS-5.2-x86_64-bin-DVD.iso"
ide1:0.deviceType = "cdrom-image"
ide1:0.allowGuestConnectionControl = "FALSE"

ethernet0.generatedAddress = "00:0c:29:90:02:7c"
scsi0:0.redo = ""
vmotion.checkpointFBSize = "16777216"
pciBridge0.pciSlotNumber = "17"
pciBridge4.pciSlotNumber = "21"
pciBridge5.pciSlotNumber = "22"
pciBridge6.pciSlotNumber = "23"
pciBridge7.pciSlotNumber = "24"
scsi0.pciSlotNumber = "16"
ethernet0.pciSlotNumber = "32"
vmci0.pciSlotNumber = "33"
ethernet0.generatedAddressOffset = "0"
vmci0.id = "-258997636"

ide1:0.startConnected = "TRUE"

debugStub.linuxOffsets = "0x0,0xffffffff,0x0,0x0,0x0,0x0,0x0,0x0,0x0,0x0,0x0,0x0,0x0,0x0"
tools.remindInstall = "TRUE"

bios.forceSetupOnce = "FALSE"

tools.syncTime = "FALSE"
scsi0:1.fileName = "xen_2-000001.vmdk"
scsi0:1.mode = "persistent"
scsi0:1.present = "TRUE"
scsi0:1.redo = ""
[root@QA-Blur-DB-2 /data/vmware/xen]# cat xen.vmxf
<?xml version="1.0"?>
<Foundry>
<VM>
<VMId type="string">52 14 62 37 ca 91 85 51-4b c4 cf c6 7b ed 6f ec</VMId>
<ClientMetaData>
<clientMetaDataAttributes/>
<HistoryEventList/></ClientMetaData>
<vmxPathName type="string">xen.vmx</vmxPathName></VM></Foundry>
[root@QA-Blur-DB-2 /data/vmware/xen]#
11. 复制虚拟机
配置文件的uuid设置为空,第一次启动会生成新的uuid
cp -rp xen xen2
cd xen2

sed -i '
/ˆdisplayName/c displayName = "xen2"
/ˆuuid.location/c uuid.location = ""
/ˆuuid.bios/c uuid.bios = ""
#/ˆvc.uuid/c vc.uuid = ""
' xen.vmx

vmrun -T server -h https://localhost:8333/sdk -u root -p 'yourpasswd' register '[standard] xen2/xen2.vmx'
vmrun -T server -h https://localhost:8333/sdk -u root -p 'yourpasswd' start '[standard] xen2/xen.vmx'
12. webAccess
有时webAccess出问题,连接不上. 重启即可
[root@DEV-Blur-DB-1 /var/log/vmware]# service vmware-mgmt start
Starting VMware management services:
   VMware Server Host Agent (background)                   [  OK  ]
   VMware Virtual Infrastructure Web Access
[root@DEV-Blur-DB-1 /var/log/vmware]#
-fin-


